Getting Started

Hexo is a fast and powerful static blog generating framework, it's based on Node.js. By using Hexo you can write articles easily with Markdown, and besides the grammer of Markdown, you can also use tag plugins provided by Hexo to insert special formated content simply. In this page we assume you have installed Hexo and created a site with it.

You can visit Hexo Docs to see how to install Hexo.

Documentation Variables

There are two main configuration files using by Hexo and both called `_config.yml`: 1. The first one is under site root directory, which contains Hexo's config. 2. The second one is under theme root directory, which is provided by NexT and contains theme's config. Let's call the first one – site config file, and the second one – theme config file.
All `available settings` will be inside code blocks (with single backtick or `` tags).
And all **`default settings`** will be bold inside code blocks (with single backtick or `` and `**` or `` tags).
All recommended settings will be highlighted under the success label.
All deprecated settings will be highlighted under the warning label.
And all possible errors will be highlighted under the danger label.

NexT Installation

It's easy to install Hexo theme: you can just download the NexT theme, copy the theme folder to the themes directory under site root directory and specify in site config file your theme root directory. The detailed steps are as follows:

Downloading NexT

If you know about Git, you can clone the whole repository and update it in any time with `git pull` command instead of downloading archive manually. Open your Terminal, change to Hexo site root directory and clone latest master branch of NexT theme:
1
2
$ cd hexo
$ git clone https://github.com/theme-next/hexo-theme-next themes/next
1. Go to NexT version Release Page. 2. Choose the version you need and download the Source Code (zip) in the Download section. For example v6.0.0. 3. Extract the zip file to site's themes directory and rename the extracted folder (`hexo-theme-next-6.0.0`) to `next`.
You also can read [detailed installation instructions](/docs/getting-started/installation/) if you want any other installation variant.
If you still use NexT version 5, you can read [instructions for update from v5 to v6](/docs/getting-started/update-from-v5/).

Enabling NexT

Like all Hexo themes, after you download it, open site config file, find theme section, and change its value to next (or another theme directory name).

hexo/_config.yml
1
theme: next

Now you have installed NexT theme, next we will verify whether it is enabled correctly. Between changing the theme and verifying it, we'd better use hexo clean to clean Hexo's cache.

Checking NexT

First start Hexo local server, and enable debug parameter (by adding --debug), the whole command is hexo s --debug. You can see the output while running, and if you find problem, you can use the output to help others locate error better. When it prints:

INFO  Hexo is running at http://0.0.0.0:4000/. Press Ctrl+C to stop.

Now you can open http://localhost:4000 in your browser, and check whether the site works correctly.
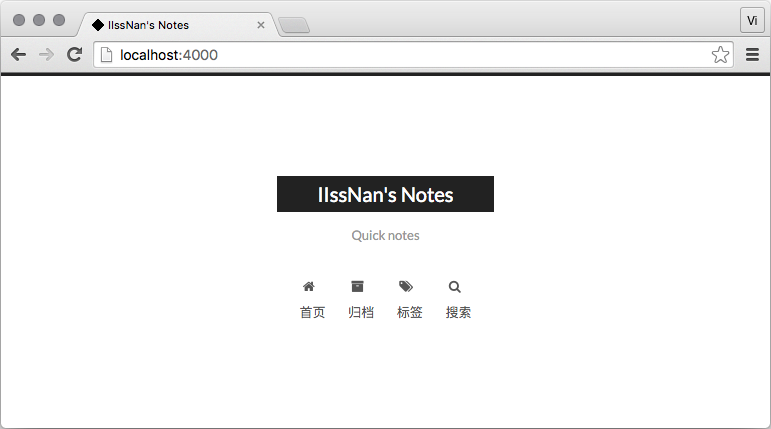
If you find your site looks like this picture, you have installed it correctly. That’s default NexT scheme – Muse.NexT Muse

Now you've installed and enabled NexT. In next steps we will change some settings including personalization and third-party services integration.

Adding Plugins

There are 2 variants to hook up NexT plugins:

  • Local installation (plugins scripts will loaded from your site).
  • CDN links (plugins scripts will loaded from remote hosts).
If your site hosted on VPN (or any other) server with NGINX configuration, recommended to use local installation.And if your files deployed to any free hosting service (Github, Gitlab, etc.), recommended to use CDN links.
In NexT config now you can find dependencies on each module which was moved to external repositories which can be found by main organization link. For example, you want to use `fancybox` in your site. Go to theme config file and see:
next/_config.yml
1
2
# Dependencies: https://github.com/theme-next/theme-next-fancybox
fancybox: false
Then turn on `fancybox` and go to «Dependencies» link with installation instructions of this module.
If you use cdn for any plugins, you need to replace your cdn link. For example, you want to use `fancybox` and you configured a cdn link. Go to theme config file and see:
next/_config.yml
1
2
3
4
5
6
vendors:
# ...
# Some contents...
# ...
fancybox: //cdn.jsdelivr.net/npm/fancybox@3.0.0/dist/js/jquery.fancybox.pack.js # Set or update fancybox cdn url.
fancybox_css: //cdn.jsdelivr.net/npm/fancybox@3.0.0/dist/css/jquery.fancybox.min.css # Set or update fancybox cdn url.
And jsDelivr CDN is recommended to deliver our third-party plugins because it is fast in everywhere and has the valid ICP license issued by the Chinese government. It does not only crawl the js files from npm packages, and it crawls from the GitHub Releases! We could use the following link to reference the js files, just as other CDNs.
1
//cdn.jsdelivr.net/gh/user/repo@version/file
And it could automatically minify the JS and CSS files, even if you don't have the minified version. Just use the `filename.min.js` or the `filename.min.css` to replace the file above. And we also provide other optional CDNs, including the famous CDNJS and the Bootcss which has the quite high access speed in China.

NexT Configuration

Choosing Scheme

Scheme is a feature supported by NexT, by using Scheme NexT gives you different views. And nearly all config can be used by those Schemes. Till now NexT supports 4 schemes, and they are:

  • Muse → Default Scheme, this is the initial version of NexT. Uses black-white tone and mainly looks cleanly.
  • Mist → A tighter version of Muse with a tidy single-column view.
  • Pisces → Double-column Scheme, fresh like your neighbor's daughter.
  • Gemini → Looks like Pisces, but have distinct column blocks with shadow to appear more sensitive to view.

You can change Scheme by editing theme config file, searching scheme keyword. You'll see 4 lines of scheme settings and can enable one of them by removing it's # and added # to previous.

next/_config.yml
1
2
3
4
#scheme: Muse
#scheme: Mist
#scheme: Pisces
scheme: Gemini

Choosing Language

Edit site config file, set the value of language to the language you need. For example, English looks like this:

hexo/config.yml
1
language: en

Now NexT supports following languages:

Language Code Example
English en language: en
简体中文 zh-CN language: zh-CN
繁體中文 zh-TW or zh-HK language: zh-TW
Русский ru language: ru
Français fr language: fr
German de language: de
日本語 ja language: ja
Indonesian id language: id
Português (Brasil) pt or pt-BR language: pt
한국어 ko language: ko
Niederländisch nl language: nl
Tiếng Việt vi language: vi
Italiano it language: it
Türk tr language: tr
If you want to add or improve language for NexT theme, you can do it easily with crowdin service.

Configuring Menu Items

Menu settings items have format Key: /link/ || icon which contains 3 values:

By default NexT provides home and archives items. To customize menu items, edit the following content in theme config file:

All custom pages which commented by default under `menu` section need to create manually. See [«Custom Page Support»](/docs/theme-settings/#Custom-Page-Support)
next/_config.yml
1
2
3
4
5
6
7
8
9
menu:
home: / || home
#about: /about/ || user
#tags: /tags/ || tags
#categories: /categories/ || th
archives: /archives/ || archive
#schedule: /schedule/ || calendar
#sitemap: /sitemap.xml || sitemap
#commonweal: /404/ || heartbeat

Dynamic sub-menu within hierarchy structure is also supported. Add your sub-menu items in menu section in theme config file as following:

next/_config.yml
1
2
3
4
5
6
7
8
menu:
home: / || home
archives: /archives/ || archive
Docs:
default: /docs/ || book
Third Party Services:
default: /third-party-services/ || plug
Algolia Search: /algolia-search/ || adn
If your site runs in a sub-directory, please remove the prefix `/` from the link.

By default NexT shows the icons of menu items without badges.

Configuring Favicon

By default the Hexo site use NexT favicons in hexo-site/themes/next/source/images/ directory with different size for different device.

We recommend that you put custom favicons into hexo-site/source/ directory. To get or check favicons, you can visit Favicon Generator. In this way, you must remove /images prefix from pathes, and rename & redefine the name or format of favicons in favicon section in theme config file, otherwise Next will rewrite your custom icons in Hexo.

hexo/_config.yml
1
2
favicon:
small: /images/favicon-16x16-next.png
hexo/_config.yml
1
2
favicon:
medium: /images/favicon-32x32-next.png
hexo/_config.yml
1
2
favicon:
apple_touch_icon: /images/apple-touch-icon-next.png
hexo/_config.yml
1
2
favicon:
safari_pinned_tab: /images/logo.svg
hexo/_config.yml
1
2
favicon:
android_manifest: /images/manifest.json
hexo/_config.yml
1
2
favicon:
ms_browserconfig: /images/browserconfig.xml

Configuring Avatar

By default NexT doesn't show avatar in sidebar. You can configure it by editing values under avatar setting in theme config file.

For first test you can uncomment `/images/avatar.gif` value near the `avatar.url` setting to see default avatar:
next/_config.yml
1
2
avatar:
url: /images/avatar.gif
Then you need to specify your own avatar. It can be done one of the ways below:
Put your avatar under site directory `source/uploads/` (create directory if it doesn't exists). And then change option to `avatar: /uploads/avatar.png`.
Put your avatar under theme directory `source/images/`. And then change option to `avatar: /images/avatar.png`.
Current site uses avatar under theme directory from file located in `next/source/images/apple-touch-icon-next.png` with following config:
hexo/_config.yml
1
2
3
4
5
6
theme_config:
avatar:
url: /images/apple-touch-icon-next.png
rounded: true
opacity: 1
rotated: false
You also can specify any external URL with absolute path to image: `http(s)://example.com/avatar.png`
Set up rounded of avatar by changing the value of `avatar.rounded`: * `true` → Avatar will be rounded. * **`false`** → Avatar will be squared.
next/_config.yml
1
2
avatar:
rounded: false
Set up rotated of avatar by changing the value of `avatar.rotated`: * `true` → Avatar will be rotate under the mouse hovering. * **`false`** → Avatar will not rotate under the mouse hovering.
next/_config.yml
1
2
avatar:
rotated: false
The value of opacity should be choose from 0 to 1 to set the opacity of the avatar: * **`1`** → Avatar will be in default opacity style. * `0` → Avatar will be transparent.
next/_config.yml
1
2
avatar:
opacity: 1

Configuring Author

Edit site config file and set the value of author to your nickname.

hexo/_config.yml
1
2
# Site
author:

Configuring Description

Edit site config file and set the value of description to your description, which can be a sentence you like.

hexo/_config.yml
1
2
# Site
description:

NexT Deployment

Local Deployment

  1. Modify files locally.
  2. Localization testing: hexo clean && hexo g && hexo s.
  3. Deployment: hexo g -d.

Continuous Integration

  • Edit the file directly online, effective immediately
  • Automatic deployment, simultaneous deployment to multiple locations
Wafer solved the problem of CI always updating old blogs.
Travis CI enables your team to test and ship your apps with confidence. It’s built for everyone and for projects and teams of all sizes, supporting over 20 different languages out of the box, including Javascript and Node.js, Ruby, PHP, Python, Mac/iOS, as well as Docker, while giving you full control over the build environment to customize it to your own needs.
There are two ways to obtain the necessary permissions for Travis CI. Deploy Key has the advantage of high security, while Access Token has the advantage of being more flexible.
This method applies to a warehouse with a private Submodule * Create an empty branch of `source` in the repository where the blog source is hosted. * Get the Access Token: Settings -> Developer settings -> Personal access token -> Generate new token. Set access rights according to the actual situation. It should be noted that the access token is only displayed once on this page, and it should be copied, otherwise it can only be regenerated. * Use github account to log in to Travis CI website. You can find the warehouses in the current github account, select the warehouses to be deployed, and then click setting. Fill in the personal access token generated by github and select the branch that the warehouse needs to be monitored by Travis.
Deploy key is a SSH key set in your repo to grant client read-only (as well as r/w, if you want) access to your repo. This method is suitable for most public blog repositories and there are no private sub-modules in the repositories. * Create an empty branch of `source` in the repository where the blog source is hosted. * Generate a ssh key
1
$ ssh-keygen -t rsa -b 4096 -C "{email}" -f ~/.ssh/deploy_key
* Add the deployment public key in your repo, and delete it
1
$ rm -f deploy_key.pub
* Use the Travis command to encrypt private key, and add it to git
1
2
3
4
5
$ gem install travis
$ travis login
$ travis encrypt deploy_key
$ rm -f deploy_key
$ git add deploy_key.enc
hexo/.travis.yml
1
2
3
4
5
6
7
8
9
10
11
12
13
14
15
16
17
18
19
20
21
22
23
24
25
26
27
28
29
30
31
32
33
34
35
36
37
38
39
40
41
42
43
44
45
46
47
48
49
50
51
52
53
54
55
56
57
58
59
dist: trusty
sudo: required

addons:
ssh_known_hosts:
- github.com
- git.coding.net
apt:
packages:
- nasm

env:
global:
- TZ=Asia/Tokyo

language: node_js
node_js: node

branches:
only:
- source

git:
depth: false
submodules: false

cache:
apt: true
directories:
- node_modules

before_install:
# Git Config
- sed -i 's/git@github.com:/https:\/\/github.com\//' .gitmodules
- git config --global user.name "YOUR-GITHUB-NAME"
- git config --global user.email "YOUR-EMAIL"

# Restore last modified time
- "git ls-files -z | while read -d '' path; do touch -d \"$(git log -1 --format=\"@%ct\" \"$path\")\" \"$path\"; done"

# Submodules
- git submodule update --recursive --remote --init

# Deploy history
- git clone --branch=master --single-branch YOUR-BLOG-REPO .deploy_git

# SSH Setup
- openssl aes-256-cbc -K $encrypted_693585a97b8c_key -iv $encrypted_693585a97b8c_iv -in deploy_key.enc -out deploy_key -d
- eval "$(ssh-agent -s)"
- chmod 600 ./deploy_key
- ssh-add ./deploy_key

install: npm install

before_script:

script:
- hexo clean
- hexo g -d
GitLab offers a continuous integration service. If you add a `.gitlab-ci.yml` file to the root directory of your repository, and configure your GitLab project to use a Runner, then each commit or push, triggers your CI pipeline. The `.gitlab-ci.yml` file tells the GitLab runner what to do. By default it runs a pipeline with three stages: build, test, and deploy. You don't need to use all three stages; stages with no jobs are simply ignored. 1. Add `.gitlab-ci.yml` to the root directory of your repository, and configure it. 2. Upload `scaffolds`, `source`, `themes`, `.gitignor`, `.gitlab-ci.yml`, `_config.yml`, and `package.json` to your Gitlab repository.
1
2
3
4
5
6
$ git init
$ ssh -T git@gitlab.com
$ git remote add origin YOUR-GITLAB-REPO-SSH-LINK
$ git add .
$ git commit -m "COMMIT MESSAGE"
$ git push -u origin master
There are two ways to configure `.gitlab-ci.yml`:
* Get the Access Token: Settings -> Developer settings -> Personal access token -> Generate new token. Set access rights according to the actual situation. It should be noted that the access token is only displayed once on this page, and it should be copied, otherwise it can only be regenerated. * Configure `.gitlab-ci.yml`:
hexo/.gitlab-ci.yml
1
2
3
4
5
6
7
8
9
10
11
12
13
14
15
16
17
18
19
20
21
22
23
24
25
26
27
28
29
30
31
32
33
34
35
36
37
38
39
40
41
42
43
44
45
46
47
48
49
50
51
52
53
54
55
56
before_script:
- export TZ='Asia/Shanghai'
- git config --global user.name "YOUR-USER-NAME"
- git config --global user.email "YOUR-EMAIL"
# Restore last modified time
- "git ls-files -z | while read -d '' path; do touch -d \"$(git log -1 --format=\"@%ct\" \"$path\")\" \"$path\"; done"
# Install ssh-agent if not already installed, it is required by Docker.
# (change apt-get to yum if you use a CentOS-based image)
- 'which ssh-agent || ( apt-get update -y && apt-get install openssh-client -y )'
# Run ssh-agent (inside the build environment)
- eval $(ssh-agent -s)
# Add the SSH key stored in SSH_PRIVATE_KEY variable to the agent store
- ssh-add <(echo "$DEPLOY_PRIVATE_KEY")
# For Docker builds disable host key checking. Be aware that by adding that
# you are suspectible to man-in-the-middle attacks.
# WARNING: Use this only with the Docker executor, if you use it with shell
# you will overwrite your user's SSH config.
- mkdir -p ~/.ssh
- '[[ -f /.dockerenv ]] && echo -e "Host *\n\tStrictHostKeyChecking no\n\n" > ~/.ssh/config'
# In order to properly check the server's host key, assuming you created the
# SSH_SERVER_HOSTKEYS variable previously, uncomment the following two lines
# instead.
# - mkdir -p ~/.ssh
# - '[[ -f /.dockerenv ]] && echo "$SSH_SERVER_HOSTKEYS" > ~/.ssh/known_hosts'
- apt-get update -qq && apt-get install -y -qq pandoc

image: node:6.10.2

pages:
cache:
paths:
- node_modules/
script:
- npm install hexo-cli -g
- npm install
# NEXT NPM installation
- npm install hexo-symbols-count-time --save
- git clone https://github.com/theme-next/theme-next-pace themes/next/source/lib/pace
# NEXT NPM installation
- ./node_modules/hexo/bin/hexo generate
- cd ./public
- git init
- git config --global user.name "YOUR-USER-NAME"
- git config --global user.email "YOUR-EMAIL"
- git config --global push.default simple
- git add .
- git commit -m "gitlab-auto-deploy"
- git push --force --quiet --set-upstream https://github_access_token@github.com/username/username.github.io.git master # replace github_access_token
# - git config http.postBuffer 524288000
# - git push --force --quiet --set-upstream https://username:password@git.coding.net/username/reponame.git master # replace username & password, please escape the password

artifacts:
paths:
- public
only:
- master
Deploy key is a SSH key set in your repo to grant client read-only (as well as r/w, if you want) access to your repo. This method is suitable for most public blog repositories and there are no private sub-modules in the repositories. * Generate a deploy key
1
$ ssh-keygen -t rsa -b 4096 -C "{email}" -f ~/.ssh/deploy_key
* Click `SETTINGS-CI/CD → Variables` in Gitlab, copy the content of private key and defined it as custom variable `DEPLOY_PRIVATE_KEY`. * Configure `.gitlab-ci.yml`:
hexo/.gitlab-ci.yml
1
2
3
4
5
6
7
8
9
10
11
12
13
14
15
16
17
18
19
20
21
22
23
24
25
26
27
28
29
30
31
32
33
34
35
36
37
38
39
40
41
42
43
44
45
46
47
48
before_script:
- export TZ='Asia/Shanghai'
- git config --global user.name "YOUR-USER-NAME"
- git config --global user.email "YOUR-EMAIL"
# Restore last modified time
- "git ls-files -z | while read -d '' path; do touch -d \"$(git log -1 --format=\"@%ct\" \"$path\")\" \"$path\"; done"
# Install ssh-agent if not already installed, it is required by Docker.
# (change apt-get to yum if you use a CentOS-based image)
- 'which ssh-agent || ( apt-get update -y && apt-get install openssh-client -y )'
# Run ssh-agent (inside the build environment)
- eval $(ssh-agent -s)
# Add the SSH key stored in SSH_PRIVATE_KEY variable to the agent store
- ssh-add <(echo "$DEPLOY_PRIVATE_KEY")
# For Docker builds disable host key checking. Be aware that by adding that
# you are suspectible to man-in-the-middle attacks.
# WARNING: Use this only with the Docker executor, if you use it with shell
# you will overwrite your user's SSH config.
- mkdir -p ~/.ssh
- '[[ -f /.dockerenv ]] && echo -e "Host *\n\tStrictHostKeyChecking no\n\n" > ~/.ssh/config'
# In order to properly check the server's host key, assuming you created the
# SSH_SERVER_HOSTKEYS variable previously, uncomment the following two lines
# instead.
# - mkdir -p ~/.ssh
# - '[[ -f /.dockerenv ]] && echo "$SSH_SERVER_HOSTKEYS" > ~/.ssh/known_hosts'
- apt-get update -qq && apt-get install -y -qq pandoc

image: node:6.10.2

pages:
cache:
paths:
- node_modules/
script:
- npm install -g hexo-cli
- npm install
# NEXT NPM installation
- npm install hexo-symbols-count-time --save
- git clone https://github.com/theme-next/theme-next-pace themes/next/source/lib/pace
- hexo generate
- git config --global user.name "YOUR-USER-NAME"
- git config --global user.email "YOUR-EMAIL"
- hexo deploy

artifacts:
paths:
- public
only:
- master